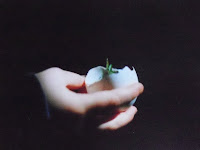
 Well, some, anyway. :)
 It’s that time of year (here, in this climate) when I’m going to indoor plant some of those all important “crops.” In fact, I’m late. But somehow, this year, this feels right, and I have long learned to trust my instincts. So using some of those yogurt cups I kept out of the recycle bin, I’ve just started some Thai peppers, and some tomatoes: Beefsteak and Sweetie.
If you're a beginner at this, here are some tips:
 These yogurt containers are roughly the same size as a #3 pot and if you eat yogurt, they’re free. They are made with a recyclable plastic (5), but they are going to be recycled in another way before they hit the blue bin. To make them into starter pots though, you need drainage. I use an old ice pick to poke holes in the bottom of the cups... 3 or 4 holes does the trick. Use a nail, a small skewer or whatever you have to do this. Just remember that the holes go in the bottom of the container, not in your hand. ;o)
  If you don’t have yogurt cups, there are other alternatives to buying starter pots. Egg shells spring to mind. You just save any good egg shell halves when you have eggs, wash them out and save them till you have enough to do your planting. If your eggs come in clear plastic cartons, these can be used as an incubator for your starting plants... at least until they sprout. (If you leave them covered too long, they can develop molds.) But just the cardboard cartons work too, leaving them open of course. When you plant your wee sprouts into a larger pot, or into the garden, just crack the shell a little to make it easier for the developing roots.
 Another option is making your own newspaper pots. It doesn’t take long. Just cut out rectangles of newsprint (from a paper that uses natural, vegetable dyes, which I think most do now).

 Cut slits the size of pot you want. Fold the middle flap first, then fold everywhere else too, wrap the end flaps around the middle flap, and staple.
  Voila! A great starter pot that you can plant right into the ground. In fact, the collar of newsprint around your fledging plant will help protect it from cutworm. I usually tear a little hole in the bottom when planting, just to make it easier for those young roots. But just making sure it's good and wet when you plant is probably good enough. No, I don't worry about the staples. I very consciously removed most of them the first time I did this. But I noticed that the ones left just rusted away.
 Set your starter pots in a bright window and/or get an 18" plug-in fluorescent light to place on wall or ceiling over your trays of plants. It won't use very much energy, but will provide that little boost of light for your plants.
Fill pots of choice with sterilized planting soil of course ~ a nice light mixture is preferable. Plant a few seeds in each, cover with earth, water lightly. Check them daily. Using a spritzer to water is a good idea to prevent over-watering. When I water my plants, my husband says I just "tease" them. But they love it, because the plants should be kept moist, not wet.
More to come! But this gets us started on the coming garden season!
No comments:
Post a Comment